When connecting your SD card with the computer, sometimes you may see messages like “The disk is write protected” on a Windows PC, or you’ll notice the SD card is “read-only” on Mac. The write protection on your SD card can prevent your card from accident deletion or malicious modification. However, it’s also an obstacle when you try to write to the memory card. Want to know how to fix? Don’t worry, this post will share 3 solutions to unlock the SD card.
Solutions to unlock the SD card
Solution 1: Remove physical write protection from your SD card
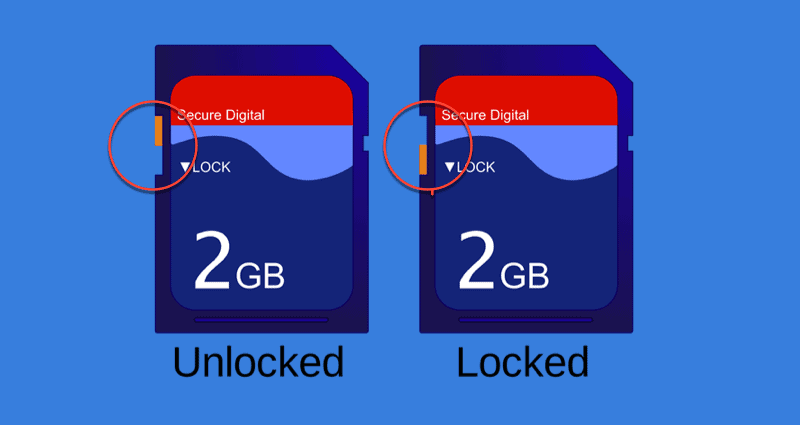
Generally speaking, all standard SD cards have a physical lock which can be switched up and down to enable or disable the write protection. Therefore, when you find it unable to write to your memory card on a Windows computer, a Mac, or on the digital camera, you are first suggested to check the lock. Here’s what you can do:
Step 1: Locate the Lock switch on your standard SD card. For mini and micro SD card, you need to insert it into an SD card adapter, and then find the switch on the adapter.
Step 2: Slide the Lock switch up to the unlock position (Refers to the featured image).

Step 3: Reinsert the SD card (or SD adapter loaded with micro SD card) to your devices, then you can modify the contents on the SD card.
If you can’t write to the memory card, still, check the next solution.
Solution 2: Disable read-only protection from your SD card
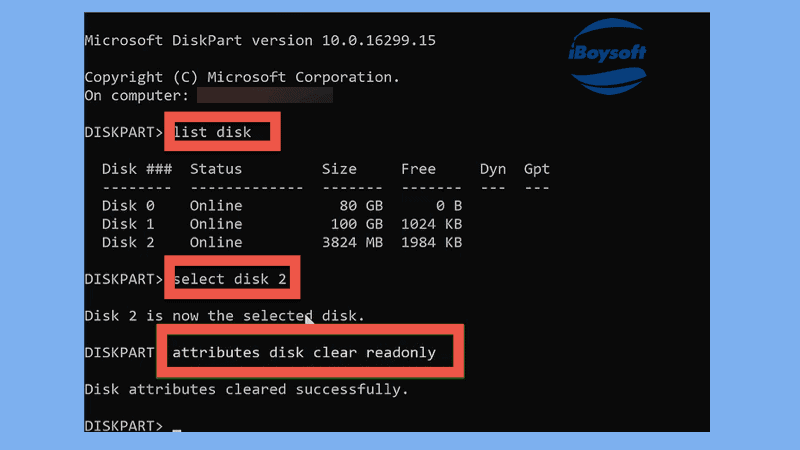
Though it doesn’t happen often, sometimes the SD card is set to have read-only permission by the administrator of Windows when formatting the card. Such digital write protection could be removed using diskpart command on Windows 10/8/7, if you are the administrator of your PC. The process might be technical for normal users, so grab your attention and follow the steps with 100 percent caution.
Step 1: Click the Windows logo or Start in the bottom-left corner of your desktop.
Step 2: Type in: command prompt for search and run Command Prompt as an administrator from the results.
Step 3: Type in: diskpart into Command Prompt followed by pressing the Enter key.
Step 4: After allowing it to make changes, type in: list disk and press Enter.
Step 5: Locate your SD card according to the disk information and remember its disk number.
Step 6: Type in: select disk number and replace “number” with your SD card’s number, then press Enter.
Step 7: Type in: attributes disk clear readonly and press Enter.

Once you see “Disk attributes cleared successfully” message in the prompt window, your SD card won’t be write protected.
Solution 3: Fix corrupted SD card with repair tool
It’s very likely you can’t write to your SD card because it’s corrupted for some reason. To check and troubleshoot the errors, you need to do the following.
On Windows PC:
Step 1: Find your SD card in File Explorer and right-click on it.
Step 2: Choose Properties in the context menu.
Step 3: Choose Tools and then click on the Check button.
On Mac:
Step 1: Open Finder, go to the Applications folder, Utilities folder, find Disk Utility and open it.
Step 2: Click on View and choose Show All Devices to list all detected disks and volumes.
Step 3: Select your SD card in the left sidebar.
Step 4: Click First Aid on the top menu of Disk Utility.
Step 5: Click Run to check and repair errors in this drive.
Once the SD card is repaired, you can reinsert your SD card to your device and access it again. If the three solutions above don’t work, find more solutions to solutions to fix the SD card errors.


Leave a Reply