
Introduction
As a Mac user whose Mac model device runs with an M1/T2 chip, then one of the obstacles that are likely to be encountered is the m1 files loss issue or losing data from T2 secured Mac. Which can be very challenging and even time-consuming to recover or restore. How ever, data recovery from M1 chip Mac or T2 secured Mac doesn’t means impossible, with a powerful data recovery tool which is compatible with M1 chip and T2 based Mac, Mac data recovery just like a piece of cake. Now, let’s dive in the powerful Mac data recovery software which is compatible with M1 chip Mac and T2 based Mac- Tenorshare 4DDiG.
Part 1: Tenorshare 4DDiG Mac Data Recovery Summary
Let’s have a look at what Tenorshare 4DDiG is all about so you can get to know more about what the best data recovery for mac entails. Ready? Then let’s jump right into it.
1. What is 4DDiG Mac Data Recovery
4DDiG Mac data recovery is undeniably a reliable and easy-to-use data recovery software to restore M1 Mac lost data for all related Mac devices embedded with the T2 based Mac.
2. Main Features of 4DDiG Mac Data Recovery
4DDiG Mac data recovery has a lot of amazing features that make it a highly recommended and best data recovery for mac, some of its features include:
- It supports data recovery from Mac and all Mac based devices, including SD card, USB, etc.
- Compatible with M1 chip Mac and T2 based Mac data recovery
- High data recovery efficiency
- Supports data recovery from Mac without need to disable SIP
- Easy to use
Part 2: Why is it Difficult to Recover M1/T2 Chip Mac Data?
There are several reasons why it is difficult to recover M1/T2 Chip Mac data. Some of the reasons are:
- The M1/T2 chip is built with highly advanced data encryption and thus makes it hard to penetrate in the process to restore m1 files in a data loss situation.
- It is also very challenging to recover M1/T2 chip mac data because its level of security is very high which makes it almost impossible to breach.
Part 3: How to Recover Lost Data from M1 Chip/T2 Mac with Tenorshare 4DDiG Mac Data Recovery?
Here we will explain below two cases on how you can recover successfully lost data from bootable and unbootable M1 chip/T2 mac with the use of Tenorshare 4DDiG
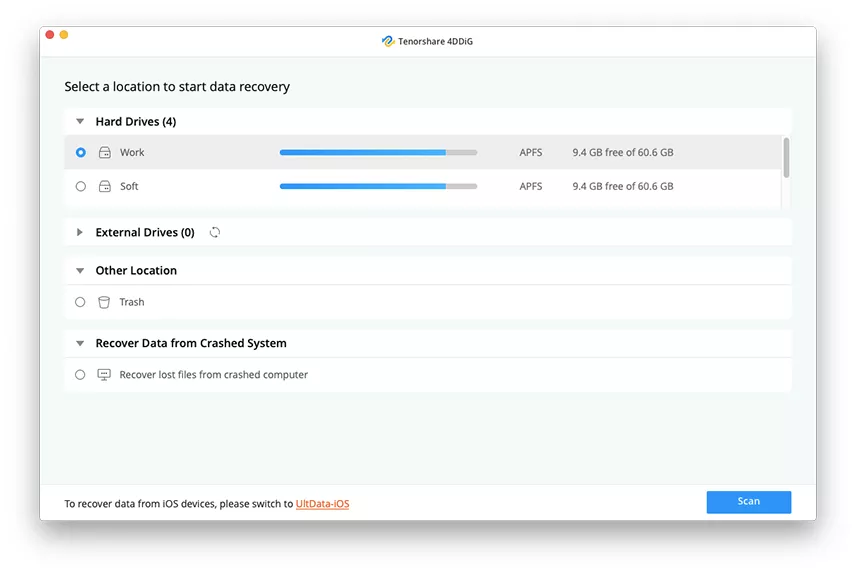
Case 1: Recover Data from Bootable M1/T2 Mac Hard Drive/Trash/HDD
Follow the step-by-step process below to restore M1 Mac data from M1/T2 Mac hard drive/trash/HDD effortlessly:
Step 1: To begin, firstly choose a location such as your hard drive to get started with the Mac data recovery. Then, click on the “Scan” button located at the bottom right corner of the interface.
Step 2: After that, the scanning result will be shown to you and you can preview it. So select the particular type of files to get more details.

Step 3: After you have previewed the scanning files, then select your preferred files and click “Recover” button which is located at the bottom right corner of the interface. But, remember to select the data storage location.

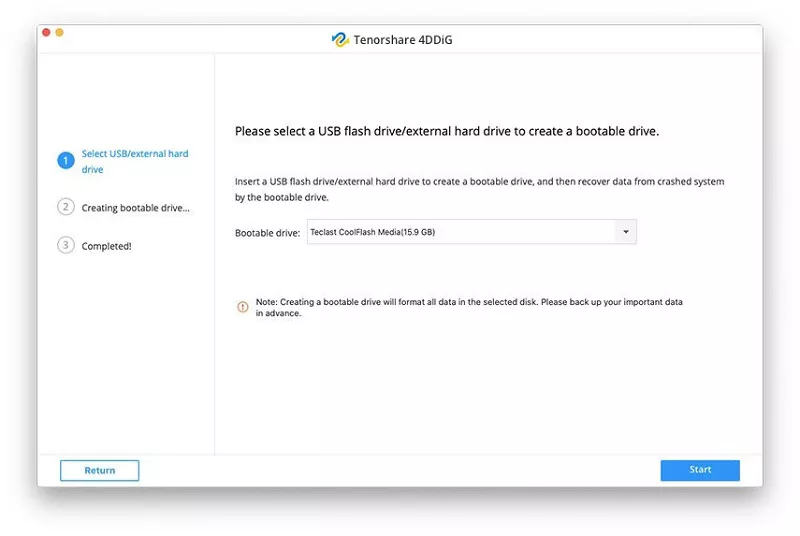
Case 2: Recover M1/T2 Mac Data that Won’t Boot
The step-by-step guide below explains how you can recover M1/T2 Mac data that won’t boot:
Step 1: Before start the recovery process, you need to prepare a bootable Mac and an USB or other external hard drive to boot up the crashed Mac. Now choose “Recover from Crashed System” and click on “Scan” which is located at the bottom right corner of the interface to start boot up the unbootable Mac.

Step 2: Now connect the USB to your working M1 Mac, and navigate to the option of Mac’s “Bootable drive”. Choose the bootable drive and click on “Start” and now the bootable drive will be created. Moreover, you will be notified by Windows pop-up to remind you to proceed with data back up.
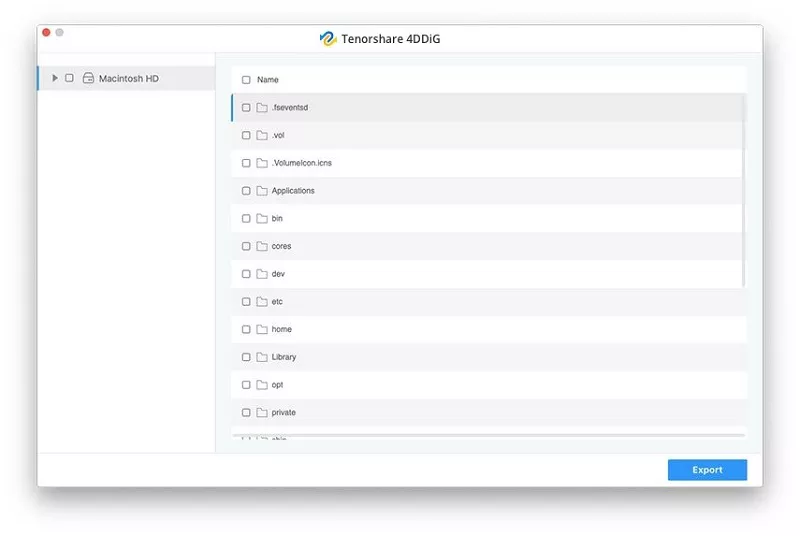
Step 3: After the creation of the bootable drive, then connect it to the unbootable/crashed M1 Mac, and Tenorshare 4DDiG will be run by Mac and the list of all the files will be shown to you on the interface. So select the preferred files you want to recover and click on “Export” button which is located at the bottom right corner of the interface. Then you are free to recover the data on your bootable drive.
Part 4: Pros and Cons of 4DDiG
Pros
- 4DDiG is compatible with all data recovery, including photos, music, documents, and so on
- It is an easy-to-use data recovery software for users which makes data recovery process stress-free.
- 4DDiG can recover data from various devices, including internal devices and external devices, such as USB, SD card, external HDD, and so on
- 4DDiG supports M1 chip Mac and T2 Based Mac data recovery
Cons
- Large files cost time to restore.
- No free recovery option
Conclusion
Without mincing words, you will agree that you have gained a lot in this article in knowing how to recover and restore m1 files or data in case of a data loss situation and this makes it the review of Tenorshare 4DDiG which is the most recommended recovery software and best data recovery for mac that is compatible with M1/T2 chips. The Tenorshare 4DDiG review is very essential so you don’t have to go through any stress again when it involves Mac data recovery situations.